Thursday, December 30, 2010

Snowflake Cupcakes


I just recently made these snowflake cupcakes for a client.  I tried so many different methods in trying to make the snowflakes that they left me wanting to run and not make anything at all.  I tried making them with royal icing which is great for those that have the steady hand technique.  But then there's me.  The snowflakes I aimed to make with the royal icing turned out to look like weary pretzel sticks stuck together with glue :-(     I had seriously underestimated how hard it would be to make these darn little things.  So as I went on my day, I headed out to my local cake shop supply store for some items that I had to get.  It was also an excuse to just walk away from the project and take a breather. 
Well, I walk in to the supply shop as I always do, and I start skimming the isles to check out all of the cool new items that may have arrived.  I take my leisurely walk, letting my creative bubble be filled with so many ideas that I pick up with all of the inspiration that is lended to you when you visit.  I finish my visual tour by taking the items I picked up along the way to the registar when I catch a glimpse of snowflakes, a picture of snowflakes on a package.  In the package was an interesting gadget, actually 3 of them.  I swear the entire store became dark and the package was being illuminated by some light derived from up above somewhere.  Oh my gosh!  It was a stamp and cutter snowflake maker!  Woo hoo!  My prayers had been answered.  What's the best way to get a product out in the prettiest way possible...having a cutout of course.  So as law would have it, I had to buy it and take the credit for having made some damn pretty snowflakes all by myself   :-D


FYI, the shop I visited was ABC Cake Shop in Orange, CA.  Visit if you're nearby but beware of the force that will have you making cupcakes and cakes after your visit.

Thursday, December 16, 2010

DIY - Fondant Baby Carraiges

This is a babyshower cake, which I'm sure you would guess by seeing the baby carraiges on the side, oh and the Baby sign on top :-)   As I was making it, I couldn't stop thinking at how easy it was to make these little carraiges and I wanted to show YOU!  You can make them yourself and use them to top cupcakes or to decorate your own cakes. 


So here we go...

These are the supplies you'll need, fondant (you can make your own fondant using this recipe from a prior post FONDANT recipe) in 2 colors of your choice. You'll also need round fondant cutters available from Wilton, Icing (color of your choice), #3 tip, pizza cutter, sharp knife or Exacto blade, fondant roller (regular roller is fine as long as the fondant doesn't stick to it).


Roll out your fondant about 1/4" thick and make a cut-out with the large circle.

Next, using your pizza cutter, knife or exacto, cut the circle in half.  You will now have two half circles.


Set one half circle to the side.  Cut one of the half circles in half again.  You should now have these 3 pieces.


Now grab your small circle and cut out two circles. Roll over them a bit to make them a bit bigger.


Take the small circle cutter again and cut out two circles of a different color. 

These are all the pieces you should have.


Using a small brush with a bit of water, brush the back of the smallest circle and then place on top of the bigger circle.  Repeat this step with the other two smallest circles.


When assembling the carraige, you'll have to place it on the cake or on the cupcakes.  You'll place the 1/4 circle on top of the half circle. Then you'll place the two small circles on top of the bottom portion of the half circle.

Now to decorate it...fill your pastry bag with icing and using tip #3, swirl the edges of the carraige.  Actually, you can decorate the carraige any way that you'd like, this is just the way I did it.


And Voila!  You now have a cute baby carraige to use as a decoration for your cake or cupcakes.

Monday, December 13, 2010

Christmas Cheer

This past weekend I had the opportunity to create a dessert table for a mommy group christmas party in Irvine, CA.  It was a christmas party for the mommy's night in get-together.  It was also a small group of no more than 20 moms so not alot of desserts were requested, only enough to make a good impression.

The desserts on the menu were...

Snowflake Brownies....Chewy brownie bites dipped in milk chocolate and sprinkled with shredded coconut.

Gingerbread cookies....these were snowflake shaped but none the less, gingerbread.


Peppermint Candy....peppermint candy shaped into stars and round christmas tree ornaments.

Red Velvet Cupcakes.


The table was adorned with snowmen provided by the host, a couple candles and chocolate bars wrapped in christmas cheer.


I will post the recipe on how to make the Snowflake brownies in another post so check back soon!

Thursday, November 11, 2010

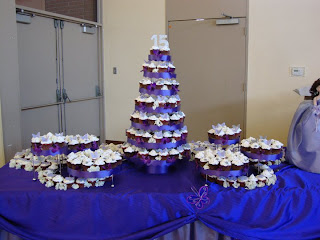
Cupcake Tower - 350 Cupcakes!


So I was on hiatus for a while but I came back with a bang!  I whopped out 350 cupcakes for this cupcake tower.  The original stand I purchased was not going to arrive on time so I improvised and used 2 3-plate cake servers.  I was pleasantly pleased by the outcome and am ready to do it all over again ;-)

The tower was decorated with butterflies, flowers and purple silk ribbon.  The linen and doll were provided by the host and worked perfectly with the look I was trying to achieve. 

Thursday, September 30, 2010

Cake - Chanel Purse

I know Purse cakes are pretty popular yet I don't receive many requests for them so I was extremely thrilled when I finally did get asked to make one.  This was an rather easy cake to make because the design was simple so it was a perfect "starter" purse cake.  I'm hoping to get more orders to make this kind of cake, it'll really tests my skills. 

Sunday, September 26, 2010

Cake - Pain


Funny story about this cake.  See this picture....

The character on the left is Pain, and on the right, his name is Naruto.  The request was to make a cake that depicted the character Pain.  Well, in my own little world of not paying attention to the email that was sent me I started to make Naruto.  Not until I re-read the email, which is a good habit of mine, did I realize that hmmmm I think I might be making the wrong guy!  First, I've never even heard of this cartoon because well I'm in 30's and the only cartoons I know these days are Family Guy and The Simpsons, which I doubt (and really hope) 13 year olds are not watching those, and 2nd, my son isn't old enough to become a fanatic of japanese animation.  Lucky for me though I had only started to attach the hair pieces which should of been orange instead of blonde. 

I didn't have time to make a new batch of fondant and dye it in orange so I did the next best thing...grabbed my food brush and painted over the blonde :-D   Problem solved....the end.

Friday, September 24, 2010

Cake - Naughty Cake II


I tried pixilating the picture so I could post it.  I think it's okay in the pixalating department but it's good enough right?  Fun cake to make as always.

Thursday, September 23, 2010

Press - The Book! The Book!


Here it is!  The cover to the book where my some of my work is being showcased.
The book is to be released in October and can be purchased through Amazon.com.  I've provided this link, 1000 ideas, where it is currently available for pre-orders.  I don't, in any form, receive royaties or incentives for promoting it.  I am putting it out there because I am so excited that I will be published, well not I, but my work will be published.  I will, again not me specifically me, but my work will be in print forever!  I hope this is the first of many.  I will pursue this craft indefinitely and I hope to inspire you as well. 

Tuesday, September 21, 2010

Parties - Disney Cars and Racing theme

Here is a Disney Cars themed dessert table created by yours truly :-D
The table included popcorn, candy coated pretzel rods, sugar and chocolate chip cookies, and of course cake, made of course, by yours truly :-D


Here's a close up of the cake and cookies.  The cookies had edible images on them of Lightning McQueen.


The pretzel rods were covered in candy shaped like racing cars and they were delicious!  Party hats were used as popcorn cones.


A seperate table was used for gifts and was decorated with a Cars pinata and the birthday boys picture. 


Baby snack trays were also placed on this table to seperate them from the adult food.  Each tray contained a snack bag of Gerber Crunchies, a peach fruit cup, a baby banana, and a sandwich with Apple Butter spread to avoid an allergic reactions from using peanut butter.

These cute little coolers were handmade and provided by the birthday boys grandmother.  Aren't they the cutest thing?  The were filled with Capri Suns and Sunny Delight juice bottles.  Two of them were made and one was placed on both the dessert table and baby snack tray table.  Darling!

Each table contained a chips and salsa tray and decorated with a few plastic cars on the tables for the kids to play with.

Of course a Cars themed party wouldn't be complete without the Cars Pinata!  The little guy looks a litte sad to be hitting his Car friend. Awwww, but there are so many yummy things inside.

Cake - Maroon & Eggplant Colored Bridal Shower

The cake was iced in buttercream and beautiful, fresh maroon colored blooms were used.


Each of the boxes you see on the tables had a cupcake in them.  You can make these yourself, I've posted a tutorial on this blog, click on this link to view DIY-Cupcake Favor Boxes.  What you can't see is that each of the cupcakes had the bride-to-be's monogram on them in the coordinating color.  Pretty cute idea right?

Friday, September 17, 2010

Cake - Football Season is here!

Football season is here and of course the requests for football cakes are starting to roll in.  This one was made a few months ago.  The nice thing about this football cake is that you can add any logo to the cake.  Maybe even doing a halfer, like half a logo of one team with half the logo another team.  Although, the more I think about it, the more I'm thinking it's a bad idea.  If you know a true football fan you'll know they would give you the evil eye or worse if you dare put another teams logo next to their precious team logo.  So never mind on that idea unless you're a brave lad, which I'm not.

Tuesday, September 14, 2010

Parties - Toy Story

This is a cool pinata, yah?  It's unordinary because it's a box filled with ballons, books, and other toys.    This is such an innovative way to keep tradition without decaying our childrens's teeth!

Anyone thirsty for some green radio active liquid, aka punch.

How cool is this!  A bubble machine.  Give your party a kid fun atmosphere by turning one of these on at your outside party.  You could use it if your party is indoors if you don't mind the blotches it will leave on your couch, curtains, dog....etc.   

Another awesome idea...an outdoor movie viewing corner.  A TV was set up outside with chairs for the little viewers.  A popcorn machine right next to the space added a little more fun to the space.  What movie was being shown, you ask?  Toy Story, the movie, of course!

Can't have a party without cake.  The cake had little Toy Story figurines on it.
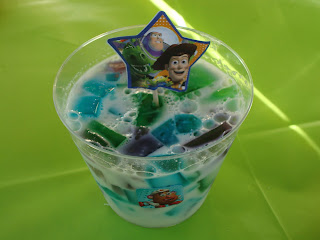
And to compliment the cake...a side of Jello a la Toy Story.

And the coordinating plates of course my horse ;-)

All in all, it was a super fun party.  It was awesome for the kiddies and adults alike.  The day ended in Toy Story bliss.  Great job Robin!  It all looked so awesome :-D

Parties - Bringing my inspiration to your home!

I, myself, love looking at pictures of other parties so that I can get ideas, or in other words "copycat" ideas for other parties or parties I may host myself.  Is it wrong to copycat?  I don't think so, especially when things don't ever turn out exactly the same as what you had seen.  In any case, the times I have taken ideas from others is merely for the purpose of using their great ideas to my party, and isn't that a compliment rather than a "stab in the back".  Or if that was the case, we'd have to pay Martha Stewart "royalty fees" or some other fees to use her ideas and what fun would that be?  It's all about saving money and doing this yourself these days, is why I myself love to share things I've done and hopefully inspire your inner "Martha" :-D  So on that note, the sections titled Parties will be pictures of real parties from others and myself.  Enjoy!  You copycat....just kidding ;-D

Fine print:  No, Martha doesn't endorse this blog.  In fact, she has absolutely no idea who I am.  I am only a small person in this big world with Big dreams.


Sunday, September 12, 2010

Cake - The Godfather

Very simple cake and easy to decorate once I got the hang of it.  Printed the logo then traced over it on a piece of parchment paper.  Then I used the parchment paper to trace the logo once again onto the black fondant.  I indented the design onto the fondant with a gumpaste tool.  Then using a tip #3, which is pretty fine, I proceeded to outline the logo and fill it in with buttercream.  The end result.....see picture above.  Not much to it but to do it :-)